
Hassled by rows of nail polish bottles that you always end up knocking over? This easy-to-make stand will surely help.
by Ankita Pathak
Most of us have rows and rows of nail polish bottles that take a great deal of arranging. Besides, when we want a colour in the back row, we have to lift each bottle separately to get the required bottle.
But today, this easy DIY nail polish display stand will just make your life easier. Plus, it looks really pretty and is fun to make!
Add your own spin to the three-tier cupcake stand by turning it into a display! Having a rotating fixture is super convenient for larger table top displays, especially for makeup and nail polish holders. You don’t have to worry about knocking over what’s in front of you and can conveniently view things in the back just by turning the stand.
You will need:
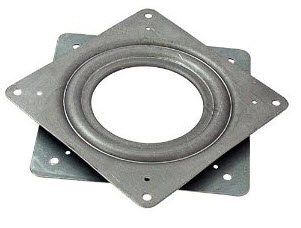 – Rotating kitchen bearing
– 2 square pieces of wood or anything with a flat surface
– A glue gun
– Glue sticks
– Ruler
– Blade
– Pretty plates in small, medium and large sizes
– Spacers : old glasses or candle holders
The process:
– Have your glue gun heated and ready, starting with the smallest plate first. With the plate upside down, measure and mark the center of the plate with a marker or masking tape.
– Next, mark the circumference of the glass around the center of the plate. This will help center the glass nicely.
– With a hot glue gun, apply glue to the rim of the glass, then quickly put it on the plate before the glue hardens. This is why you should make markings first to avoid gluing the glass unevenly.
– It’s time to mark the larger plate the same way you did with the plate before. 
– Place the hot glue onto the open end of your glass and quickly cover it with the plate.
– Use rubbing alcohol to remove the marks you made with your sharpie. If you want your display to be taller, just repeat the earlier steps.
– Take out that bearing and the two flat boards. Next, sandwich the bearing between the boards. Make sure to mount it in the center!
– Ready your glue gun and place glue on all four corners of your bearing. Quickly apply on one board, and repeat with the other piece of wood.
– Now, to mount the base to your display, apply glue to the top surface of your sandwich, then quickly place the whole display you made earlier over it.
Voila…your stand is ready!