Categories
Beauty

Six home remedies for puffy eyes

Wake up looking like you spent the night in a pub? Take our six-step home cure to treat your peepers.
by Beverley Lewis

Swollen eyes can not only alter your looks, but also cause others to misinterpret your lifestyle. A little insight, however, can help determine the cause for marshmallow eyes, and the six home remedies outlined here, can make them very simple to treat.

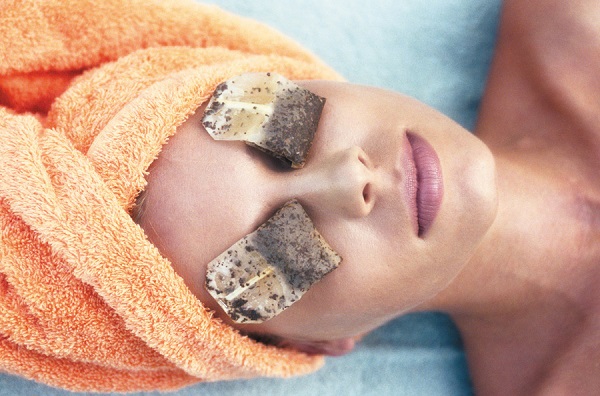
Bag ’em: Teabags can help soothe puffy and irritated eyes as they not only contain powerful antioxidants, but they also contain anti-irritant properties. To get rid of the puffiness, place moist tea bags over your eyes.

For this, first soak the teabags in hot water for a few minutes and then take them out. Allow them to cool down to a warm temperature. Then, lie down on your couch or bed and place the tea bags over your eyelids (as shown in cover pic) and cover them with a soft cloth. Leave on for about 20 minutes, after which you will notice that the swelling around the eyes has reduced a bit. Do this every day and watch the puffiness disappear.

Grab some H2O: The easiest way to get rid of puffy eyes is to drink enough water. Try and drink at least eight to ten glasses of water each day. When the body is well hydrated, there is less chance of water retention, which can cause your eyelids and other parts of your body to swell. Water will also help flush out toxins from the body. Along with increasing your intake of water, also try and reduce the amount of salt you eat and avoid sodas and coffee, as they cause dehydration. Coconut water is also a great for curing puffy eyes, as it keeps the body well hydrated and flushes out the kidneys.

Be cool: Chilled cucumber slices are perfect for treating puffy eyes. The enzymes and the astringent properties present in cucumber help reduce inflammation. Chill slices of cucumber in the refrigerator for about 10 minutes. Then, place the cold cucumber slices on closed eyes for around 10 minutes or until the cucumber becomes warm. Repeat the process several times a day. This remedy will also help you get rid of wrinkles around your eyes.

Mrs Potato head: Grate a mid-sized potato and place it in a clean cheesecloth and tie it up. Now place this makeshift eye pack on your eyelids and leave it on for 15 minutes. Do this several times a week and you will notice a marked difference.

Get egged: Egg whites have got skin-tightening properties that can help reduce puffiness. They are also good for preventing wrinkles. Place two egg whites in a bowl and whip them until they get nice and stiff. Next, add a few drops of witch hazel to the mixture. Witch hazel is not only good for reducing puffiness, but it also acts as a natural skin-tightening astringent.

With the help of a brush – or you could use your fingertips – gently massage this mixture under the eyes and allow it to dry before washing it out. This remedy will not only tighten the skin around the eyes, but it will also make them look less puffy.

Spooning works: Take five to six metal spoons and place them in your refrigerator for 10 minutes. Next, take out a cold spoon and hold the rounded portion against your eye for a few minutes until the spoon becomes warm. Then, quickly replace it with another cold spoon from the refrigerator.

Keep repeating this procedure until you go through all the spoons in the refrigerator. This will not only help to tighten the skin around your eyes, but will also help relax the blood vessels in the eyes and decrease puffiness.

Beverley Lewis has written for beauty magazines and has amazing tips to share. If she’s missed a tip you’ve tried for puffy eyes, tell her about it in the comments section below.

(Pictures courtesy hudabeauty.com, www.healthyskinsolutions.com)

Categories
Beauty

Nail this

Put your best foot forward with our step-by-step guide on the perfect home pedicure – get your peep-toes out, women!
by Beverley Lewis

Your toenails are a mess and you really can’t wait to book an appointment at the salon. But you can’t always make the time to get a pedicure at the parlour. So what do you do? You follow our seven-step tutorial on giving yourself a pedicure a home, that’s what you do.

You will need: nail polish, cotton balls, polish remover/acetone, hydrogen peroxide (if you have stained nails), nail cutter, nail file, bath salts, cup of milk (for calloused feet), cuticle stick, scrub and foot mask (see recipe below).

Step 1: Out with the old. Get rid of old nail polish with a large cotton ball that has been liberally doused with acetone or polish remover. If your old polish has stained your toe nails or your nails have a yellowish tint, soak a cotton ball with hydrogen peroxide and apply it on your nails. Leave this on for a few minutes and then wipe off. This should take care of the stains.

Step 2: Give it a trim. Use a nail cutter or a clipper and cut your nails straight across. To get a soft square shape, file your nails in one direction with an emory board (see pic below). Don’t clip the sides of nails, as this leads to ingrown toenails.

Step 3: Get soaked. Fill a large bowl with warm water and put in some of your favourite bath salts and aromatherapy oils. Soak your feet for a minimum of 10 minutes. The more cracked and calloused your feet, the longer you will need to soak them. If you want to get rid of dead skin, add a cup of milk to the mixture as milk is known to loosen dead skin.

Step 4: Cuticle care. After soaking your feet, your cuticles will be nice and soft. Then, using an orange stick, gently push back the cuticle. If necessary, use a cuticle remover lotion to help push back your cuticles. If you have excess skin on the sides of your nails that needs trimming, you can trim it with a cuticle trimmer.

Step 5: Scrub-a-dub. Next, give yourself a refreshing foot scrub to help remove dead skin and calluses from your feet. If you have access to beach sand, you can rub it into your skin as it makes a wonderful scrub. Alternatively, you can also use a body scrub or a homemade scrub made from sugar and olive oil.

Step 6: The mask. Instead of spending money on buying a foot mask, you can make one at home for half the cost. All you need is a tablespoon of fresh cream, 1 tablespoon of olive oil and a tablespoon of honey. Mix all these ingredients together and massage them into your feet. You can then wrap your feet in saran wrap or plastic bags. Leave this on for 20 minutes and then wash it off with warm water and a mild soap.

Step 7: A splash of colour. Use a cotton ball to remove any excess oils that may remain from your foot mask . Nail polish does not adhere well to oily nails. Use cotton balls to separate toes when painting your nails. First, apply a base coat. After it has dried, apply a coat of nail polish. Wait until this dries before applying the final coat. If you decide not to apply colour, simply apply another base coat and you are good to go.

Use these tips and tricks to give yourself a pedicure at home and you can save money and have gorgeous-looking feet all summer.

Beverley Lewis writes for beauty magazines and has amazing tips to share. Do you have a nail issue that needs sorting out? Write to Beverley in the comments section below.

(Pictures courtesy www.zenredsalonbangkok.com, perksandstyle.wordpress.com, www.webmd.com) 

Categories
Wellness

Exercises for the summer

An expert creates the ideal exercise plan for the summer. Crunches, dips, planks and squats feature on the to-do list.
by Ritesh Shaiwal, fitness manager, Fitness First India

Just as it is important to eat a balanced and largely cooling diet for the summer, it is also vital to exercise despite the heat. In fact, exercising in the summer is a great way to combat the many ups and downs that the weather causes in the system.

Additionally, we prefer to wear light clothing, and bring out the skirts, shorts, tank tops and sleeveless blouses in this season. If you want to show off your body to the best advantage and keep fit while doing so, I recommend these simple exercises:

Early morning outdoor jogs: Jogging is the best way to start your day in the summer, as it is relatively cooler in the morning. It is also a good way to keep fit across all ages.

Oblique crunches: If you haven’t already tried these, ask your trainer show you how to do oblique crunches. They are the best exercise if you want a tight mid-section. Do these if you want tight abs.

Tricep dips: Tricep dips (in pic on left) are your best bet against jiggly arms. Want to wear sleeveless blouses or tank tops? Do at least one sets of tricep dips to begin with, then gradually increase if you are able to manage more.

Pushups: Pushups are a popular warm up. It is simple yet continues to be a staple for strength training. It is excellent exercise for the arms and shoulders.

Squats: It is a strength training exercise which strengthens the lower body. However, you must get the form right while doing it. A tip to see if you’re doing it right: when you squat, your buttocks should push out (as if you are about to sit on a chair) and your knees must not go beyond the line of your toes.

Burpees: Burpee is an ultimate full body strength exercise. It is also called the squat thrust exercise. It is famous for its conditioning benefits when performed in quick succession. Do ask your trainer to show you how it’s done.

Side planks: Side plank is a form of strength exercise in a static form. It helps in strengthening the abdominals, back and shoulders.                                       

Superman raises in plank position: The same as the side plank, but with the arm outstretched and touching the toe. (See picture on right for reference.)

Walking lunges: It is a lower body exercise which helps in strengthening the lower body muscles. However, attempt static lunges before you try these. Once you get the form right, you can move on to walking lunges.

(Pictures courtesy Fitness First India, www.mensfitness.co.uk, supermamafitness.com, fitbie.msn.com)

Categories
Wellness

Eat and drink smart this summer

A celebrity nutritionist gives diet tips for the hottest months of the year. Follow his guide for a happy summer.
by Sandeep Sachdev, celebrity nutritionist, Fitness First India

The summer season hurts us in more ways than one. Apart from cloying heat and profuse sweating, the summer saps us of our strength and makes us lethargic.

Plus, we do ourselves no favours by eating and drinking the wrong things in this season. While soft drinks and ice creams normally trump healthy food and drinks, we must ensure that we eat and drink the right things to stay fit and beat the heat.

The problem of effective nutrition is compounded for those who work out and exercise heavily. What should one eat post a workout? What is the best food to eat right after exercise? How much water is too much for the body?

But it’s quite simple, really. Just follow my diet chart for the summer and you’ll be fit all through this season. Start with these fruits:

Watermelon, orange, sweet-lime: They have high water content, and they help prevent dehydration.

Apple: Helps boost immunity to combat weather changes.

Banana, guava: Help improve digestion.

Blueberries: They are low in calories and high in antioxidants.     

Mangoes: These luscious fruits are rich in Vitamin C and beta carotene.

Papaya: This fruit is good for digestion.

Litchi: Rich in vitamin C, this fruit has a good cooling property.


Also try these vegetables:

Cucumber: For its high water content, it is ideal for summers.

Sprouts: They are high in fiber.

Spinach: It is a great source of magnesium and folic acid.

And some general tips:

– Keep yourself hydrated and have fruits that are high in water content. Fruits such as apple, pear, pineapple, mango, watermelon, melon or strawberries and raspberries are rich in water and less sweet.

– I can’t stress this enough: avoid oily and spicy food.

– Have fresh juices and avoid preserved fruit juices and aerated drinks.

– Make a smoothie with fruits or yoghurt to cool the system.

What did you think of Sandeep Sachdev’s summer diet chart? Share your food and drink tips for the summer in the comments section below.

(Pictures courtesy Fitness First India, journalweek.com, www.facebook.com)

Categories
Beauty

The big bangs theory

Trimming your bangs is as easy as our 1-2-3-4-5 tutorial. Follow these steps to get the bangs without spending the bucks.
by Beverley Lewis

If you’re the kind of girl who chooses  ‘dare’ over ‘truth’ and has no problem talking to strangers, then you’ll have no qualms about grabbing a pair of scissors and trimming your own bangs. While we love the look of a full fringe, we hate how high-maintenance it can be.

Bangs have a tendency to grow out very quickly, so you have to make frequent trips to the salon to get them trimmed. But, what if you could skip the hassle of heading into the salon every few weeks and just trim your overgrown bangs at home?

We give you a step-by-step tutorial on how you can trim your unruly bangs.

Step 1: Tools of the trade: Comb and a pair of hair-cutting scissors

Step 2: Comb through: Tie your hair in a ponytail to get it out of the way, comb your bangs so they lay flat (see pic on right for reference). This makes it easier to focus on your fringe and helps you see where they need trimming. Always trim your bangs when your hair is dry. Otherwise, you may end up cutting your bangs shorter than you expected.

Step 3: Get trimming: Clamp the section with your index and middle finger and move it to either side to see how long you want the fringe to be. A safe length is under your eyes, in the centre of the nose. Place the comb underneath your bangs and pull it down before you start snipping away.

Step 4: Easy does it. Point the scissors into your hair and snip vertically (see pic on left for reference). This will give you a feathered finish rather than a flat one. Start low and work your way up to reach required length. It is best to start at the middle of your fringe and work your way toward the outer left corner. Then, trim the bangs toward the right side.

Step 5: Grand finale: Keep checking the length intermittently and even out the hair when you reach the desired length. If you want to go shorter, end under the eyebrows, but remember to leave the hair longer than the desired length because you will lose about an inch or half an inch as dry hair tends to jump up.

Beverley Lewis has been a writer for beauty magazines and has amazing tips to share. Have you ever given yourself a haircut? Tell Beverley about it in the comments section below.

(Pictures courtesy www.wikihow.com, www.hercampus.com,

Categories
Deal with it

No going back for suspended Government employees

Keeping in mind the ‘tarnishing’ of its image when suspended officials are reinstated, State draws up tough rules for reinstatement.
by The Editors | editor@themetrognome.in

Activists and citizens, please note. If you’ve been wondering and agonising over how those in Government service caught and suspended from duty after being part of wrongdoing, are reinstated after a while, take heart: the State Government of Maharashtra is taking steps to see that things change, at least slightly.

As per a Government Resolution (GR) dated April 20, 2013, the Government feels that the prior (albeit unofficial) system of reinstating a Government employee in the same position after he/she has been cleared of charges, or after he/she has carried out whatever punishment was meted out to them, shows the Government in a poor light. “Officials suspended on grounds of criminal offences or disciplinary grounds are reinstated as per a Government decision dated October 14, 2011, which clearly states the terms under which such officials may be reinstated to work. However, reinstating such an official at the same designation and place of work as before, maligns the image of the Government,” the GR states.

“Hence, the General Administration Department clarifies that in the event that a Government employee is to be reinstated to work following a spell of suspension from duty, he/she may not be reinstated in the same position, division, taluka or zilla as before. Further, he/she may be accorded a non-executive post.”

This new set of rules is to be complied with across all departments; clearly, these amendments mean that a reinstated Government official stands every chance of being transferred, apart from being posted to a job that keeps him/her away from further wrongdoing and controversy.

(Picture courtesy prokerala.com)


Exit mobile version