Categories
Film

‘Tracing Phalke’ to celebrate 100 years of cinema

NFDC releases coffee table book on life of Dadasaheb Phalke; the book contains rare details of the cine genius’ life.
by The Editors | editor@themetrognome.in

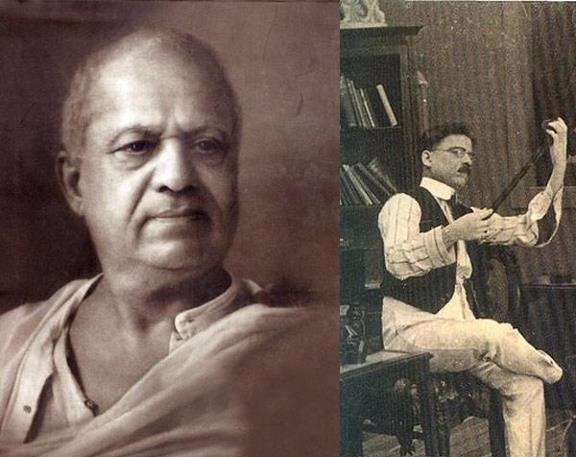
What better way to celebrate 100 glorious years of Indian cinema than to celebrate the life of the father of Indian cinema? Carrying this idea forward is Tracing Phalke, a book that chronicles the life of Dadasaheb Phalke.

“Celebrating the completion of an action-packed cinematic century of Indian cinema and the genius of Dadasaheb, NFDC (National Film Development Corporation) is pleased to announce the release of the limited edition of Tracing Phalke – researched, written and compiled by Kamal Swaroop, a film, television and radio director and screenwriter, more popularly known for his masterwork Om-Dar-B-Dar (1988),” a release from NFDC said.

The book is a “text-based visual treat that lends a magnified view into Dadasaheb’s life, the iconic coffee table book is an eponymous compilation tracing the life span of the Father of Indian Cinema, with rare details right through his schooling, places he visited, people he met and experiences that lent value to his innate genius and imagination that eventually lead to the birth of Indian Cinema.”

Speaking on the occasion of the release of the book, Swaroop, said, “I am happy that Tracing Phalke will be re-released this year just around the date of Indian Cinema completing a glorious century. And considering that NFDC is a harbinger in fostering and promoting Indian Cinema, associating with them couldn’t have been more apt for this initiative.”

Tracing Phalke is a very insightful compilation of Dadasaheb Phalke’s life by Kamal Swaroop and we are delighted to present this visual treat for film aficionados and the fraternity in this centenary year of Indian Cinema,” said Vikramjit Roy, General Manager- National Film Development Corporation.

(Pictures courtesy facebook.com, NFDC)

Categories
Beauty

Nail this

Put your best foot forward with our step-by-step guide on the perfect home pedicure – get your peep-toes out, women!
by Beverley Lewis

Your toenails are a mess and you really can’t wait to book an appointment at the salon. But you can’t always make the time to get a pedicure at the parlour. So what do you do? You follow our seven-step tutorial on giving yourself a pedicure a home, that’s what you do.

You will need: nail polish, cotton balls, polish remover/acetone, hydrogen peroxide (if you have stained nails), nail cutter, nail file, bath salts, cup of milk (for calloused feet), cuticle stick, scrub and foot mask (see recipe below).

Step 1: Out with the old. Get rid of old nail polish with a large cotton ball that has been liberally doused with acetone or polish remover. If your old polish has stained your toe nails or your nails have a yellowish tint, soak a cotton ball with hydrogen peroxide and apply it on your nails. Leave this on for a few minutes and then wipe off. This should take care of the stains.

Step 2: Give it a trim. Use a nail cutter or a clipper and cut your nails straight across. To get a soft square shape, file your nails in one direction with an emory board (see pic below). Don’t clip the sides of nails, as this leads to ingrown toenails.

Step 3: Get soaked. Fill a large bowl with warm water and put in some of your favourite bath salts and aromatherapy oils. Soak your feet for a minimum of 10 minutes. The more cracked and calloused your feet, the longer you will need to soak them. If you want to get rid of dead skin, add a cup of milk to the mixture as milk is known to loosen dead skin.

Step 4: Cuticle care. After soaking your feet, your cuticles will be nice and soft. Then, using an orange stick, gently push back the cuticle. If necessary, use a cuticle remover lotion to help push back your cuticles. If you have excess skin on the sides of your nails that needs trimming, you can trim it with a cuticle trimmer.

Step 5: Scrub-a-dub. Next, give yourself a refreshing foot scrub to help remove dead skin and calluses from your feet. If you have access to beach sand, you can rub it into your skin as it makes a wonderful scrub. Alternatively, you can also use a body scrub or a homemade scrub made from sugar and olive oil.

Step 6: The mask. Instead of spending money on buying a foot mask, you can make one at home for half the cost. All you need is a tablespoon of fresh cream, 1 tablespoon of olive oil and a tablespoon of honey. Mix all these ingredients together and massage them into your feet. You can then wrap your feet in saran wrap or plastic bags. Leave this on for 20 minutes and then wash it off with warm water and a mild soap.

Step 7: A splash of colour. Use a cotton ball to remove any excess oils that may remain from your foot mask . Nail polish does not adhere well to oily nails. Use cotton balls to separate toes when painting your nails. First, apply a base coat. After it has dried, apply a coat of nail polish. Wait until this dries before applying the final coat. If you decide not to apply colour, simply apply another base coat and you are good to go.

Use these tips and tricks to give yourself a pedicure at home and you can save money and have gorgeous-looking feet all summer.

Beverley Lewis writes for beauty magazines and has amazing tips to share. Do you have a nail issue that needs sorting out? Write to Beverley in the comments section below.

(Pictures courtesy www.zenredsalonbangkok.com, perksandstyle.wordpress.com, www.webmd.com) 

Exit mobile version